📷 The Loupedeck: edit in Lightroom with a control surface
📷 I've had a Loupdeck original, pictured above, for a long time now. There's been an upgrade to Loupedeck+ in the interim, which is
more or less the same device, but a bit modernised and slightly
restyled, with extra buttons and so on, and now there's Loupedeck Live and Loupedeck CT, both of which depart from this styling.
I am yet to try these latter two, but you can read all about them at
Loupedeck's website. I didn't upgrade to Loupedeck+ because I didn't see that there was very much more to
offer over the original Loupedeck for the expense.
This page is all about using and getting the best from the original Loupedeck. Much of what I say here is relevant to the updated Loupedeck+,
but not in the least to the Live and the CT, which are horses of an entirely
different feather.
February 2022: I'm very pleased to say that I now have a Loupedeck Live. I've been playing with it, and setting
it up according to my taste, for Lightroom in particular. I really do NOT
like it, and will be taking advantage of Amazon's generous returns policy ASAP. Read why right here
📷 What exactly is it then?
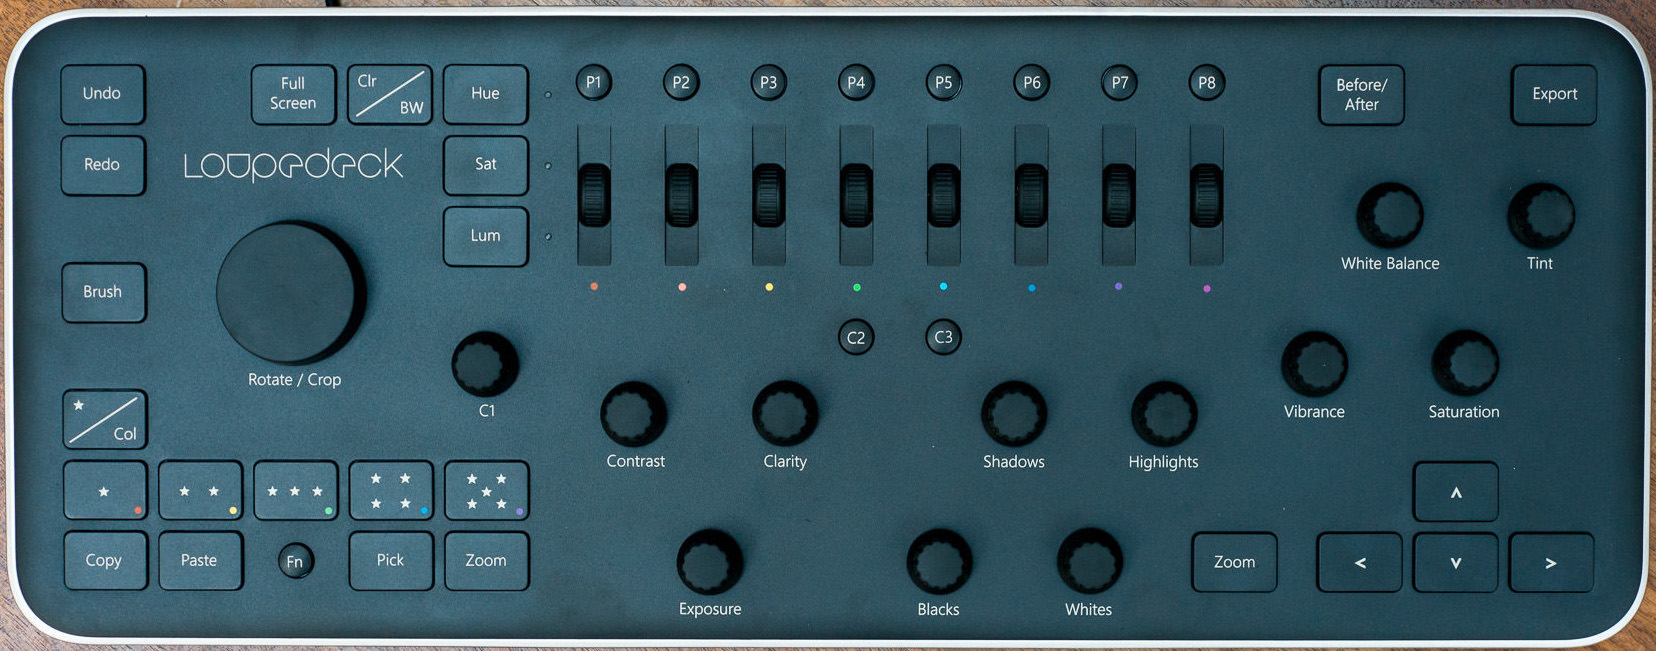
📷 There's a picture of it at the top of this page. It's a device. It sits in front of you while you're in Lightroom, measuring
(in centimetres) about 40 wide, 15 deep, and less than 3 high. It plugs into
a USB port, and doesn't need mains electricity. No need to provide you with a button and knob count, because you can very easily provide yourself with
those from the picture. The buttons are nice and tactile, with a sort
of plasticky click. The knobs rotate smoothly and easily; they're continuous, in that there's no start and end - they will turn continuously, and, generally
speaking, clicking them resets that parameter. Only that big
Rotate/Crop knob has little detents, which you can feel as you turn it. I don't really know why they gave that knob detents and not the others, but hey,
it makes little difference in its use.
As well as the the buttons and knobs, there's a set of 8 rotating edge-controlled rotators, one for each main colour, the use of each is determined by of
Hue, Sat and Lum you've previously pressed. So, for example, you can press
Sat, then turn the 5th wheel to increase blue saturation. Faces a bit green? Press Hue and fool around with the second wheel, orange, to try to dial in a
better looking face. I mention these wheels in my negatives.
See that knob marked C1, and the buttons marked C2 and C3? While there may be a factory default for their uses, in practice they are yours - do with them
what you like via the Setup software. It's a good thing that C1 is
provided as a spare knob because there is - IMHO - something fundamental missing from the control set, which I'll talk about later. Two new (since Loupedeck
was invented) Lightroom adjustments are absent, but are programmable.
More below.
The Fn button, when pressed and held, provides alternative meanings to most of the controls. A sort of shift key.
Finally for this description, there are buttons P1 to P8. The factory defaults activate one of 16 presets from people called Karo Holmberg and Loke Roos,
installed along with the Loupedeck software. They're not very nice I
think, but I have chosen 16 other presets from Lightroom's stock built-in presets and assigned them to P1 to P8 and FN P1 to Fn P8.
📷 In use
📷 I use it as one of my two tools for Adobe Lightroom. (The other is the
Behringer X-Touch Compact) which
you can read about in the link.
The manufacturer has provided setups for various other applications,
including Audition, Final Cut and Photoshop, which I don't use. However, what you will be up against
in other apps is that the legends below each control are printed, so Contrast, for example, is irrelevant in Audition, and may do something very
different. Spoil the look of it with sticky labels?? I have had to resort to this
approach, which I've described later. It may well be that you can buy overlays for the device, don't know.
Despite the apparently random placement of some of the knobs on Loupedeck it's really quite second nature to find and twist the right knob. You very
quickly learn that exposure is bottom-left among the knobs and the main colour
controls, white balance and tint, are grouped together top right. You do need to look at the device if you want to change the parameters of a particular
colour, and I do wish the little coloured dots below each were bigger. Red,
orange, yellow and green are easily remembered as the most usual values to amend, but the final four are more difficult: is that wheel for blue or cyan?
📷 The Setup Application
📷 It comes with a rather nice setup application. The latest version is multi-purpose, in that you can program not only the
Loupedeck but also the Loupedeck+, the CT, and the Live. When opening the
control software you must remember to select Loupedeck Original and Lightroom prior to fooling around with settings. This screenshot shows how the
opening screen appears; the purple rings around each control show what you can
select:
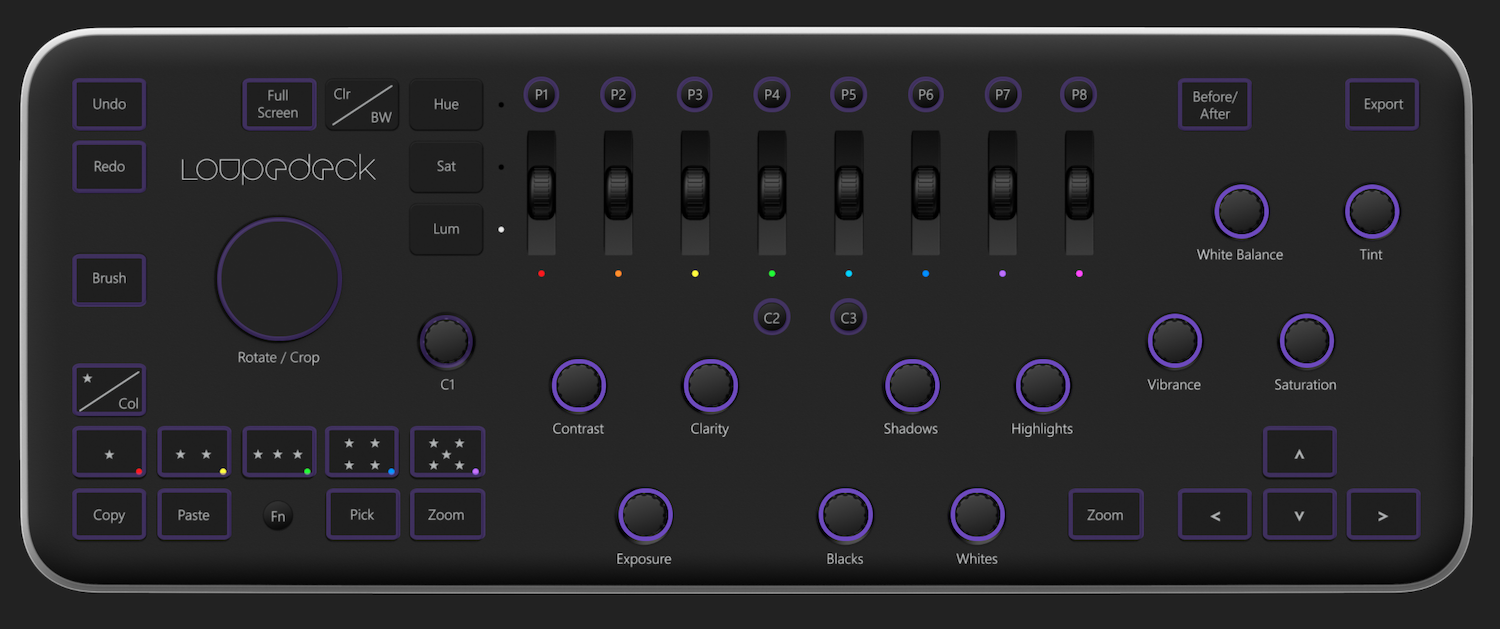
Notice which controls the purple ring is absent from? Hue, Sat and Lum should not, obviously, be changed, as they accompany the colour wheels. If you
make the picture black and white then these 8 knobs automatically turn into
B+W mixers, controlling the luminance of whatever WAS one of the 8 colours. Neat.
In this next screenshot I've clicked on the Exposure button and this is what you get:
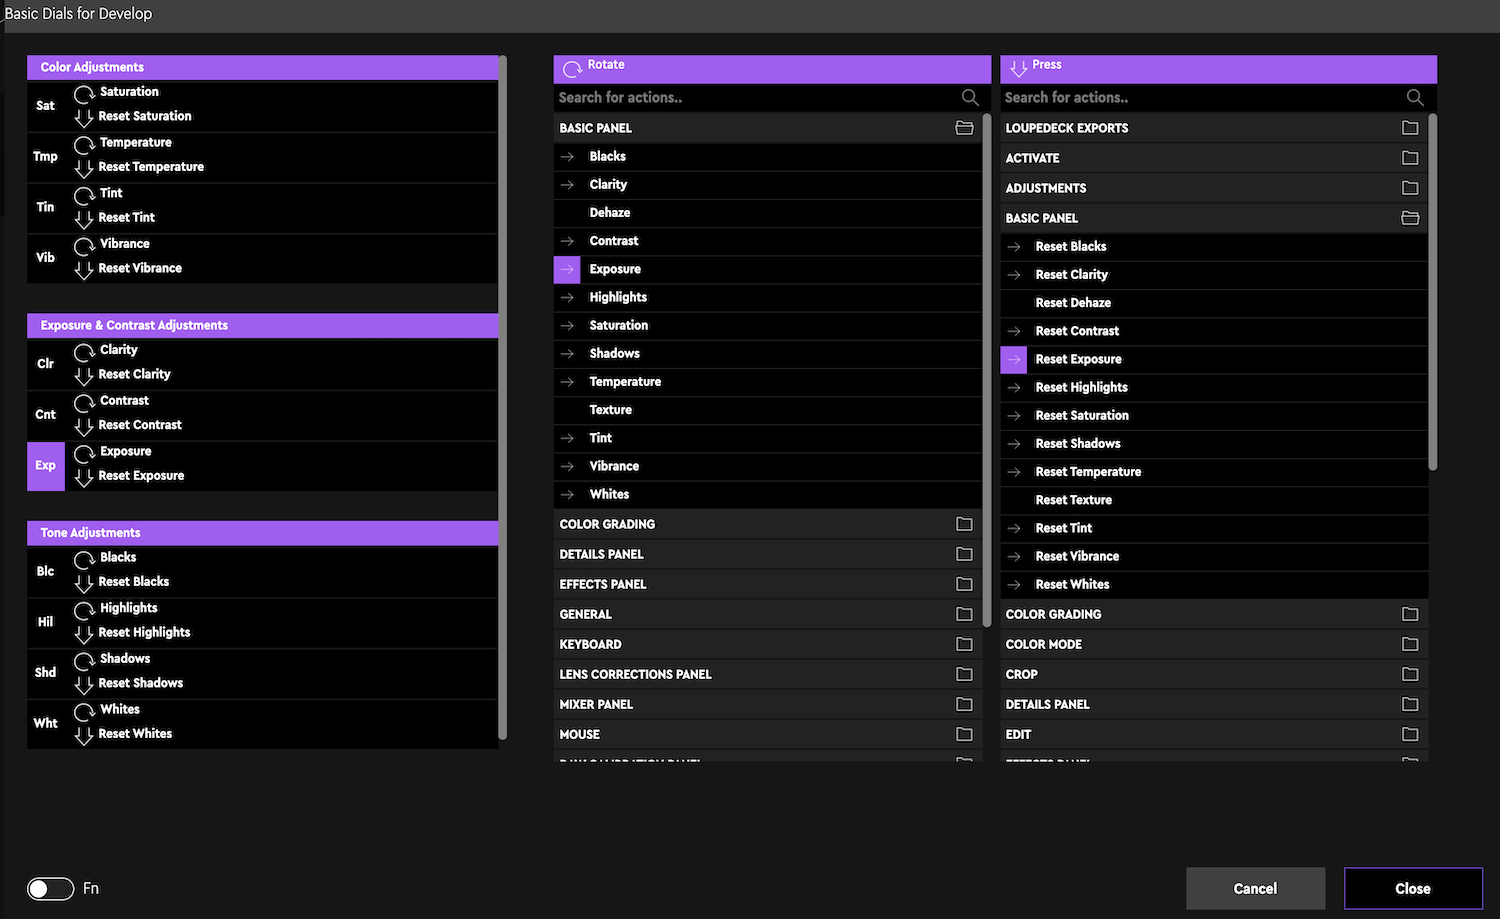
This is saying that spinning that knob adjusts exposure, and clicking it down resets exposure.
In this next screenshot I've clicked on White Balance and then set the little Fn selector to On, giving access to the secondary meanings of
each control. As you can see, I've set it to control the Lightroom Dehaze function, one
I use quite a lot. Automatically, the software has defined a click of the same knob as Dehaze reset. Similarly Texture, assigned to Fn + Tint
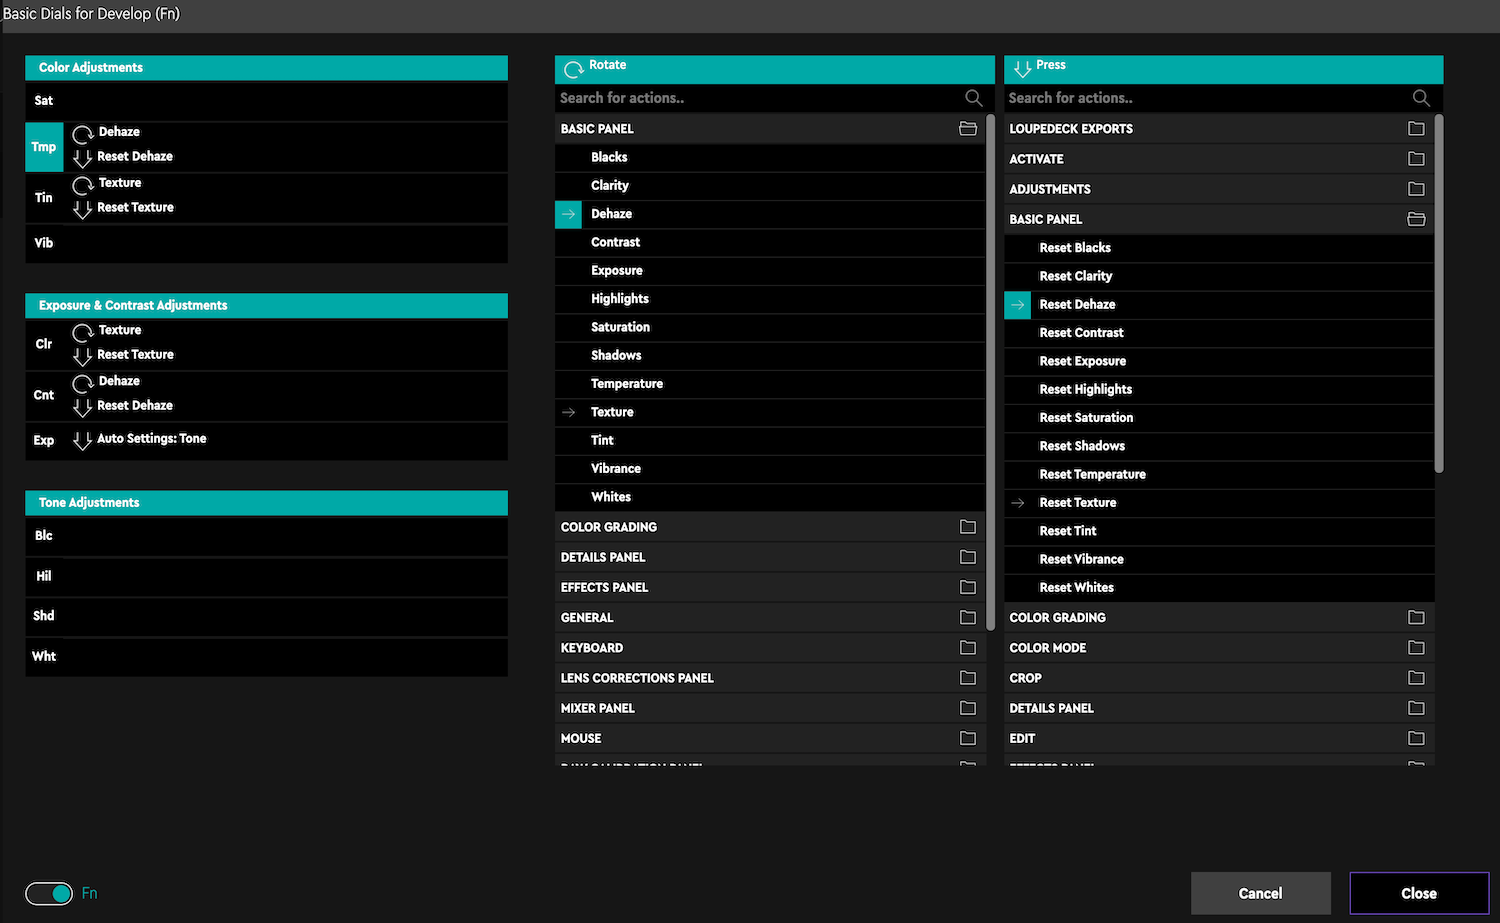
Using similar functionality in the software I've set knob C1 to control Sharpening:
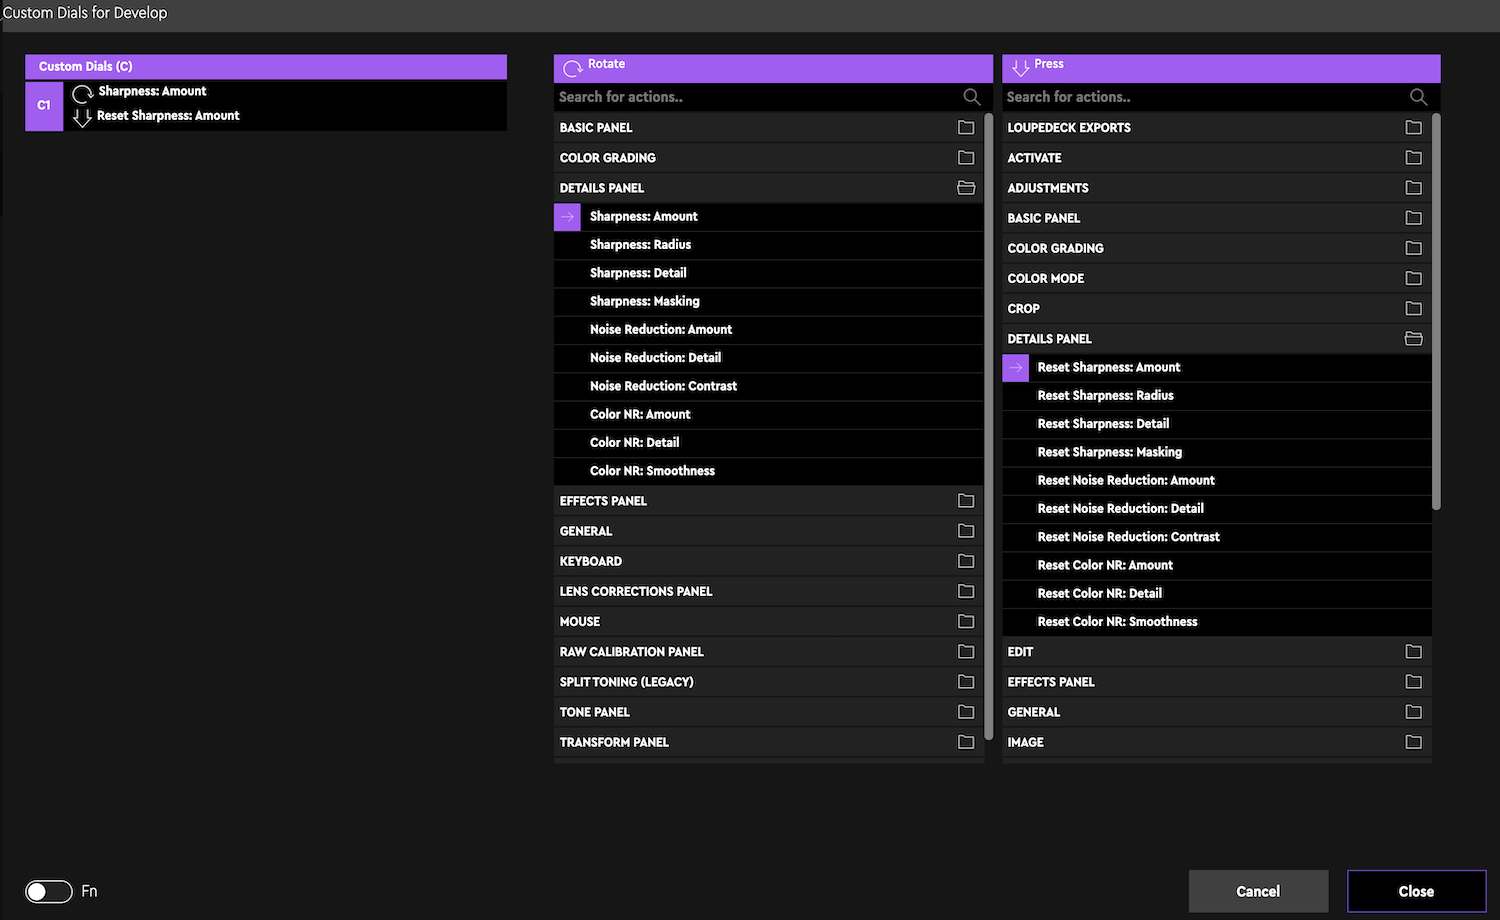
As you can see, the software is nicely laid out in three columns: what the control does, the rotate activity, and the click-in activity.
In my own Loupedeck I've done very little to change the controls. I changed the Export button to invoke Export with Previous, whereas before it
opened the Export dialog; don't need the dialog every time. I've added Sharpening as
C1. I've added Dehaze and Texture as secondary (press Fn) meanings to the White Balance and Tint knobs. I've left buttons C2 and C3 to their
defaults: Auto White Balance and Auto Tone.
📷 Moving on ...